пятница, 23 февраля 2018 г.

DIY Changing Table Pad Cover | Buffalo Plaid Lumberjack Nursery

Lumberjack Nursery Changing Table Pad Cover DIY
DIY Changing Table Pad Cover HOw to

As I have embarked on the task of creating a sweet little nursery for our new little lumberjack, due November 15th, I have discovered that their isn’t much non pastel baby items out there…or if there are, they are out of my price range! I decided to make my own little Lumberjack Changing table pad cover! It is super easy and anyone could do it! The nice thing is, you can choose fabric that you love and that matches your nursery decor. I chose something like this Buffalo Plaid fabric.

This easy sewing project took me about an hour! I’m not a professional seamstress…I’m more of a “‘wing it” sewer. It has worked out pretty good for me so far! In sewing, there are those that must have patterns and those who don’t. It kind of correlates with those who need recipes and those who don’t…wingin it is kinda my style, if you haven’t noticed! I don’t have a pattern for this project, but this will be easy for any one! Stick with me and you will see what I mean!

What you need: (i’ve included my affiliate links for your convenience)

1.5 yards of your fabric of choice ( I used a fabric with some stretch and it really worked out well. I would recommend finding a knit or other stretchy fabric to use.)

What to do:

  1. First you are going to lay out your fabric on the floor or a table to measure how much fabric you need for your changing table pad. Make sure that there is enough fabric on all sides to fold over the edge to the bottom of the pad with at least 3-4 inches extra covering the bottom of the pad. You will need room to add a seam for a pocket to put your elastic in.
    DIY Changing table pad cover Tutorial

2. After you make sure you have enough fabric on each side, cut right a square out of each corner that comes to a point at each of the corners of the changing pad. This will allow you to sew the corner pocket on each corner. You will fold the right sides together and sew a seam down each on the back side of the fabric (and later you will turn back inside out!

Easy Changing table pad cover DIY

3. Sew the corners.

buffalo-plaid-changing-table-pad-tutorial-4
DIY Plaid Diaper Changing Pad Cover

4. Fold over the edge of the cover about 1 – 1.5 inches and sew a seam, leaving a 2 inch opening so that you will be able to feed in the elastic!

buffalo-plaid-changing-table-pad-tutorial-6

5. Use a large safety-pin to feed the elastic through the pocket that you just made. Don’t cut off the end until you know how long it needs to be! I tied off the elastic and put my cover on the changing table pad to see if it would fit. I then tightened the elastic and tied a knot.

buffalo-plaid-changing-table-pad-tutorial-7

6. Sew the 2 ends of elastic together and hand sew the opening for the elastic closed…(all though I didn’t do this…I was super lazy!) .

buffalo-plaid-changing-table-pad-tutorial-8

7. It should look something similar to this on the bottom! You are all done!! I love that I can toss this into the washing machine when it gets dirty…and we all know it will!

buffalo-plaid-changing-table-pad-tutorial-10-copy
lumber jack nursery diy
Changing table pad cover tutorial
DIY Changing table pad cover tutorial
How to make changing table pad cover
Free printables Lumberjack Nursery Verses

DIY Lumberjack nursery baby boy makeover

Boys nursery Ideas
help your baby sleep through the night
Mommy Survival Kit

Free Lumberjack Nursery Printables: Clothing Storage Organizing Labels
Baby Tribal Room Arrows Free Printables

Original article and pictures take http://www.kayleeeylander.com/DIY-tips/diy-changing-table-cover-buffalo-plaid-lumberjack-nursery/ site

воскресенье, 4 февраля 2018 г.

Puzzle Coffee Table Build Plans

For those of you who don’t want to read the story and just get the build plans, here is the link to Purchase the Puzzle Coffee Table build plans

We love to do puzzles and I hate the cluttered mess of a puzzle taking up vital dinner tablespace. Of course, when you start to work on a puzzle, they usually take days if not weeks to complete, so you are left with the unsightly mess of a puzzle in progress. You stand to lose pieces because of pets or even feisty family members.

We stopped doing puzzles because of this.

270 degree-flip-top-design-patent-pending-DesignedDecor

I told Mr. DD I want YOU to build a puzzle coffee table. I want to be able to hide the puzzle so when we were not working on the puzzle I could have my pretty decor on my table. I wanted a coffee table so we did not have to use our dining room table as our puzzle building area.

I conceptualized the design in my head. I told Mr. DD that I wanted the table top to flip open because I did not want a removable top that you had to store somewhere and I wanted the flip open so I could have my pretty on the table when not working on the puzzle. My pretty takes precedence in my home. I also wanted storage drawers to hold the initial unplaced puzzle pieces. We began to talk through the design came up with additional ideas, and we roughly sketched out the idea.

Back in January, I posted my table on my site as well as my Designed Decor Facebook page. At that time my Facebook engagement was very low and I only received a few comments. I still was over the top happy with our puzzle coffee table.

Fast forward: I joined a business building group called the Inner Circle with Jennifer Allwood. She told us that we needed to grow our social media engagement in order to grow our business. She challenged all the members to a social media challenge for the month of March. We were to post to Facebook 4 times a day (UGH) and do 2 FB lives a week. I was right in the middle of selling my home as well as moving so I knew I would not be able to do the 2 lives but I did take on the challenge of the 4 posts. As hard as it was, I did it and I started to see a major improvement in my engagement with my FB fans. I continued to keep up the posts for April and that is when I reposted my puzzle coffee table.

I posted at 4:00 pm on Monday, April 16. I don’t have my cell phone set up with notifications because I believe it overtakes your life and I choose to log on to social media when I can and not live my life around the distractions. So on Tuesday, I logged in to my account and was pleasantly surprised at the large amounts of comments and shares. It continued to grow all day and by Wednesday I was able to say my post was going viral.

On Wednesday I told Mr. DD that we needed to make build plans because so many of you want and need this table. We went live to tell all of you that we were going to make the build plans so those of you that are handy, could make your own table. The response was and still is overwhelming. The comments, the stories, and the pictures have touched us deeply.

Thank you-from the bottom of our hearts-DesignedDecor

Mr. DD is self-employed as a Registered Investment Advisor, he works from home and has his own company, Strategic Portfolio Management Inc. Thankfully he did not have any trading to do and he began to create the build plans. I continued to respond to the thousands of requests and comments. Sometimes I would just sit and stare at my Facebook page in amazement of what was happening, other times I felt so overwhelmed because I was only 1 person and I felt like I needed to respond to all you, and other times I shed tears from the stories that you told me of the reasons why you needed the table, for cancer patients, for your autistic child, for your elderly parent or grandparent. I laughed at the animal stories and loved every picture that you sent of your cats laying on your puzzles. 2 days later, we had everything in order and now we needed someone to do computer sketches of the build plans.

In the midst of the viral FB post and all the build plans, my site crashed because of a malware virus and with the help of my Host, Andrew from HostingEH I only lost 1 day of visits. Andrew was great and helped me, the non-techie gal.

My blogger friend Cher from Designs by Studio C quickly created the computer plans for us. She told me not to mention her, but I am anyways. Thanks, Cher for putting a rush on our plans.

Puzzle-Coffee-Table-Chair leg-Stools-DesignedDecor

After hearing so many of you saying that you have been searching for a table to do your puzzles on and this was the perfect table and there is nothing like this out on the market, I began to google and search puzzle table options, and you are right. There are many puzzle tables out there but nothing with these exact features. I had never done a search for a puzzle table so I had no idea what was on the market. So in hindsight, this was a blessing, not even knowing what was on the market for people to purchase. My design idea was completely from my thoughts on what would make a great puzzle table and remember PRETTY was at the top of my list.

So a week ago I was organizing my pantry, trying to settle into my new home and now today we are filing provisional patents and copyrights to protect our hard work and design.

UPDATE: We have found a local manufacturer in Sugarcreek Ohio to custom make our puzzle tables. You can see all the details about the puzzle tables in my shop: https://designeddecor.com/shop/

We are truly blessed and amazed at what a viral post can do to your life. My Facebook following went from 6,100 followers to 37,000 followers and growing. The Facebook post has reached over 26 million people and continues to grow. I feel that GOD threw this opportunity into my lap and I feel the need to produce this table for all of you!

My wish is for all of you to have many happy “puzzlemaking memories” and I hope that this table helps.

Thank you, Thank you, Thank you!

Original article and pictures take https://designeddecor.com/puzzle-coffee-table-build-plans/ site

суббота, 3 февраля 2018 г.

Wooden Wine Boxes & Wine Crates

Throughout history wine was considered "The Drink of the Gods". You'd be hard-pressed to find a person anywhere that isn't familiar with wine and wouldn't enjoy a glass as you spoke with them. The soldiers of the Roman Empire considered it food, and drank it instead of water because it was a safer way to hydrate.

It's widely known by real estate agents and experts that a wine cellar increases the value of your home. Wine isn't just a drink, but is often a way to connect with friends and loved ones making a wine cellar a perfect place to entertain. Hosting social events in your cellar gives an aesthetic value but not necessarily a monetary one. Collecting wine however can quickly become a way to invest, and that's a big reason why having a wine cellar often makes your home more valuable.

In order to invest in wine you'll need a place to store it. Hearty Bordeaux and Burgundy wines are the most commonly collectible wines. This is because the grapes used in Bordeaux take many years to peak. You can drink them young but won't get the best experience until they reach full maturity. That can take as long as 15-30 years. Keeping the wine in it's best possible storage condition is the only way to get maximum value. This is called provenance.

There are 3 key characteristics to achieve the best in provenance for fine wine:

  • Darkness
  • Temperature control
  • Keeping the bottles flat on their sides

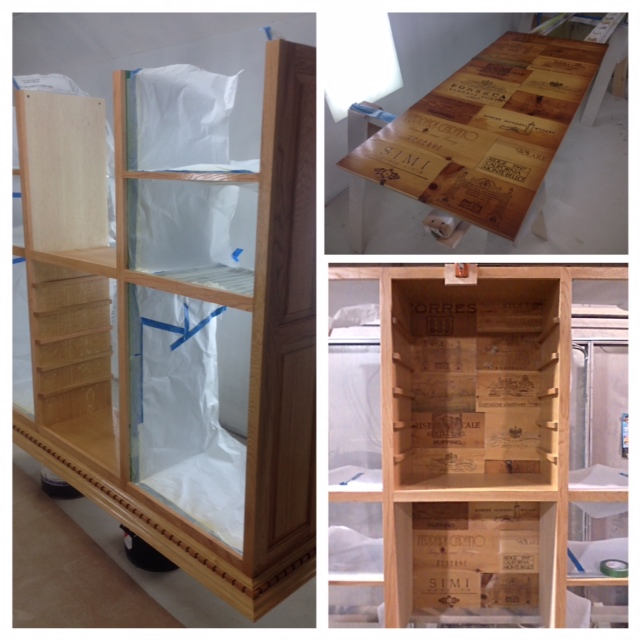
Once you have a steady temperature-control room the rest of these needs are covered with original wooden wine crates and boxes. Wine crates are designed for bottle storage because they're built to keep bottles on their sides, while maintaining darkness and a slightly cooler temperature than if the bottles were held in traditional racks and exposed to light. They also make moving wine much easier because your moving 12 bottles at a time instead of one-by-one with your hands. When your ready to sell your prized wines at a profit you can simply give the full case to the wine appraiser for sale. Not only will the wine be valued for what it is, but the complete collection of wine in it's original crate will fetch more at auction.

Wine investing and collecting can be fun but sometimes it's all about business. The aesthetic quality of a wine cellar is also important too.

Most wine cellars are in basements where the temperature is cooler. This is usually the most cost-effective option. Basements are often not selling points when buying a house. A wine cellar with a bar or entertainment area there takes an unused space and turn it into a huge benefit. The moment your buyer steps into the gorgeous wine room you've built it'll take their breath away...

Wine crates have a vintage appeal that adds a special charm to a wine room or cellar. They captivate the imagination while matching both modern and old world decor styles beautifully. A wine room is never quite complete unless it's adorned with them. The above picture is one of my favorites, and everytime I look at this space I get inspired. That's what a wine cellar or room should do for everyone.

If your looking for original wine boxes crates for your own wine room or cellar decoration visit Winepine

Patrick
sales@winepine.com
914-565-0134

Original article and pictures take http://wood-wine-crates-and-boxes.blogspot.com/ site

PVC Chicken Waterer

An easy way to keep your flock watered and not have a mess with overturned water containers!

Step 1: Supplies Needed

Here is a list of supplies that you will need for this project. I did add a few pieces to the pipes to make it easy to take apart and clean, but they could be left off to save money and to simplify the project. I will explain each addition throughout the project.

4 BeakTime Watering Cups (purchased through BeakTime.com)

2 foot piece of 1/2 inch PVC pipe

2 foot piece of 2 inch PVC pipe

3 inch piece of 3 inch PVC pipe (I had extra in my scrap pieces from previous projects)

4" X 3" PVC coupling

3" X 2" PVC coupling

4 - 1/2" adapters (male end threaded)

2 - 1/2" threaded caps

2 - 2" cleanout drain plug adapter

2" cleanout drain plug (threaded)

2" trap adapter fitting

2" 90 degree Cross Tee

2 - 2" X 1/2" Bushing

Pipe Joint Compound

PVC Cement

3 gallon or 5 gallon water jug (I chose a 3 gallon)

3 foot 2x6 lumber (I just used some scrap pieces I had)

Total cost of project is around $55.

Step 2: Cut PVC Needed

I used my compound miter saw to cut the PVC used in this project. It give nice, clean edges and is a whole lot easier on the arms. Just remember to keep steady pressure on the pipe and the saw blade and move slowly. WEAR GOGGLES!!! :)

Cut the following pieces

1. 1/2 inch pipe - cut 2 pieces 6" long and 4 pieces 3" long

2. 3 inch pipe - cut a 3 inch section

While you have your saw out, cut the wood needed for the bracket. I cut 2 pieces of 12" long. Also, you need a 6 inch piece, with 45 degree angles on each end to make the support beam. The 6 inch length will be the long length of the board.

The girls are always curious when the tools come out!

Step 3: Put the Tee Together With the Vertical Shaft

First, assemble the tee that will be at the base. Use the PVC cement to put the 2"x1/2" bushings in the left and right side of the tee. Then, cement one of the cleanout adapters to the bottom opening. Use joint compound on the cleanout plug and screw it into the cleanout adapter. Next, connect the 2" pipe to the top opening (using cement). At the top of the 2" pipe, glue the 2" trap adapter fitting on. Set this aside to cure while you work on the horizontal beams.

Step 4: Horizontal Beam Construction

Well, in the hurry of trying to get this together before the kids needed to be run here and there for sports practices, I forgot to take the detailed pictures of the construction of the horizontal beams that I had planned. UGH! We will try to make it with this one picture and a bunch of verbiage.

Start with a 3" piece of 1/2" pipe and glue one of the Beaktime cup couplers. I chose to order the ones with the 1/2" PVC couplers, but they have other ways to add them to your system. This is just the best way for ours.

Next, add the 6 inch piece to the other end of the cup coupler. The next piece will be another cup coupler, followed by another 3" piece of pipe. Make sure to line up the cups so they are straight.

Repeat these steps to construct the other side of the beam. On the outside end of each beam, install the 1/2" adapters and screw on the plug using the joint compound.

Add the other two 1/2" adapters to the bushings on the left and right side of the tee using joint compound. Once those two are in place, cement the left and right side horizontal beam making sure that the cups are lined up and that the cups sit flat so that water doesn't spill out easily.

Step 5: Top Half Construction

Another picture opportunity missed! Sorry! :)

To connect the 4"x3" coupler and the 3"x2" coupler, use the 3" piece of 3" PVC pipe and secure them together with cement. You can use a longer piece to give the top more height, but I think the closer the jug is to the wooden bracket, the less likely you will be to have the jug fall off or be wobbly.

Add a cleanout adapter to the 2" opening of the couplers with glue and allow all the pieces to cure for 2 hours or whatever the recommendations of the pipe cement is that you are using.

Step 6: Bracket for Mounting

You will need to determine where the neck of the water bottle will be on the platform of the bracket. Drill a 3 inch hole at that spot so that the cleanout adapter on the top piece sits easily inside the opening. It will need some room to be able to screw the cleanout adapter onto the trap adapter that sits atop the bottom shaft. I used a jigsaw to cut the opening, however, I would recommend a hole saw if one is available.

Disregard the first hole drawn that has the X in the middle. I chose not to use that one. I decided to push it a little further out so that I had enough room to have the angle support a long as possible. I wanted to make sure that the bracket was strong enough to withstand the weight of the water bottle when it is full.

Screw the top piece to the vertical piece that will attach to the stud or other area that you plan to install the waterer. Next, add the support piece to the bracket with screws. Start your screws in the vertical board so that it is easier to attach once the height is determined for the bracket.

Step 7: Hang the Bracket

To determine the height of the bracket, drop the top section into the hole of the bracket and screw the bottom portion to the top. When the height of the watering cups is determined, mark where the top of the bracket needs to be. Disconnect the top and bottom portions of the waterer and set aside. Mount the bracket securely to the site. I mounted mine to a stud in the run area of our coop. I centered the 2x6 board on the 2x4 and it worked great. I also am installing a 2x4 piece to run behind the water jug to take up the space between the 2x4 stud and the jug. This will also give me a extra place to put eye bolts and use bungee cords to hold the water jug to the stud. (This is not in the picture as of now, but will update the post when I get it done).

Step 8: Finish It Up!

Using joint compound, connect the top and bottom portion snuggly. Check all joints to make sure that are tight and ready for water. Open the top of the jug and insert the neck into the top. Watch for drips and tighten where necessary.

Note: I have found that my chicks like to walk behind the cup beam, sometimes causing the waterer to twist. I will be adding a new bracket with attachment points to keep this from happening. I hasn't caused any problems, other that me having to go out and twist it back into place. Just want to make sure it is safe as can be. I will add this step and pictures once I finish it.

Hope you find this helpful for your flock!

~Julie

Recommendations

Original article and pictures take http://www.instructables.com/id/PVC-Chicken-Waterer-1/ site

пятница, 2 февраля 2018 г.

10 CHRISTMAS FARMHOUSE TIERED TRAYS THAT WILL WARM YOUR HEART

Join us on a tour of Christmas farmhouse tiered trays. They are stunning and allow you to feature some fun characters. If you don’t already have a tiered tray, this post might leave you adding one to your Christmas list!

Christmas Farmhouse Tiered Tray

There is no limit to what you can display on your farmhouse tiered tray. At Christmas time that doesn’t change.

Rae Dunn pieces are popular on tiered trays, as well as gnomes, Santa, and cute marshmallow mugs.

This post contains affiliate links, which means I receive a commission if you make a purchase using the links below. All opinions are all my own.

Christmas Farmhouse Tiered Trays

Christmas Farmhouse Tiered Tray by Sweet Rose and Wren with gingerbread houses and christmas trees

Does your family decorate gingerbread houses every Christmas? These are beautiful on this farmhouse tiered tray.

The neutral colors on this tray will warm your heart and your home.

Our Apple Candle Village would be great accessories on a tiered tray, check them out!

Christmas Farmhouse Tiered Tray by The Quaint Bungalow with vintage santa mug and candy

Vintage Santa mugs and candy on this Christmas tiered tray will take you on a trip down memory lane.

Adding splashes of berries and flocked greenery make this tray super festive.

Christmas Farmhouse Tiered Tray by Blessed House of Three with copper mugs, bells and the cutest marshmallow mugs

Finding items that are small enough but great statement pieces can sometimes be challenging.

Cindy has done amazing! Mixing copper mugs, a miniature copper scale and white jingle bells create a perfect look.

We have also fallen in love with the cute marshmallow mugs! You might be seeing more further down in the post.

  • Cute Marshmallow Shaped Hot Chocolate Mugs-Ceramic-Set of 4
  • Bulk Buy: Darice DIY Crafts Jingle Bell White with Star Cutouts 2.75 inches (6-Pack) 10559-10
  • Moscow Mule Copper Mugs - Set of 4-100% HANDCRAFTED Food Safe Pure Solid Copper Mugs - 16 oz Gift Set with BONUS: Highest Quality 4 Cocktail Copper Straws and 1 Shot Glass with Recipe Booklet!

Christmas Farmhouse Tiered Tray by Welcome to the Neibaurhood with Rae Dunn and Gnomes

Mistletoe, gnomes and Rae Dunn are cheerful!

Splashes of red and green tie together this Christmas farmhouse tiered tray.

Christmas Farmhouse Tiered Trays by On Daisy Hill Drive with hot cocoa station supplies

Hot chocolate is a must when the weather is chilly. So, set up a cocoa tiered tray with all of the perfect fixin’s like Jerri has done.

Adding Rae Dunn pieces and cute marshmallow mugs with a Santa hat warm your heart before you begin sipping your cocoa.

Sylvia Cook

Christmas Farmhouse Tiered Trays by Sylvia Cook with Rae Dunn mugs, gnomes and santa vintage mugs

We are adoring these vintage Santa mugs that Sylvia has on your white tiered tray!!!

You cannot ever have enough of these mugs!!!

Adding these precious beauties will bring cheer to any Christmas tiered tray.

Get the Look

Christmas Farmhouse Tiered Trays by Tag Interior Designs with Rae Dunn pieces, gnomes and a countdown to Christmas

Peppermint strip decor on this Christmas tiered tray will make you feel like you’re in candy-land.

Cheer, holly, and jolly are great words from Rae Dunn to describe this holiday season.

Christmas Farmhouse Tiered Trays by Lori's Place grey and white themed

Lori’s tray allows you to feel as if you’re in a winter wonderland where snowflakes are falling.

The grey and white colors, keep this tray looking classy.

My Rustic Retreat

Christmas Farmhouse Tiered Trays by My Rustic Retreat with the cutest marshmallow mugs

Do you spy more cute marshmallow mugs?

We’ve never dreamed of accessorizing a cocoa mug but adding a hat on these little guys add a merry feeling to your decor.

Christmas Farmhouse Tiered Tray by House on Wren with green bottle brush trees and mini wooden house signs

Lori’s Christmas farmhouse tiered tray wraps up our post.

Her addition of green and white bottle brush trees and farmhouse wooden signs bring Christmas spirit to our final tray.

  • Department 56 Accessories for Villages Snowy White Sisal Trees Accessory Figurines, 8 inch (Set of 2)

Conclusion

If you find yourself still needing a little help with Styling Tiered Trays, we have you covered on our post.

We hope you have enjoyed this Christmas farmhouse tiered tray tour. We’ve loved sharing it with you.

Happy Decorating!

If you enjoyed these ideas, please sign up for emails, so you don’t miss out on more fun decorating tips and ideas HERE.

Original article and pictures take https://lifeonsummerhill.com/christmas-farmhouse-tiered-trays/ site